Insulate windows for winter: Top 5 Powerful Tips 2025
Why Proper Window Insulation Matters
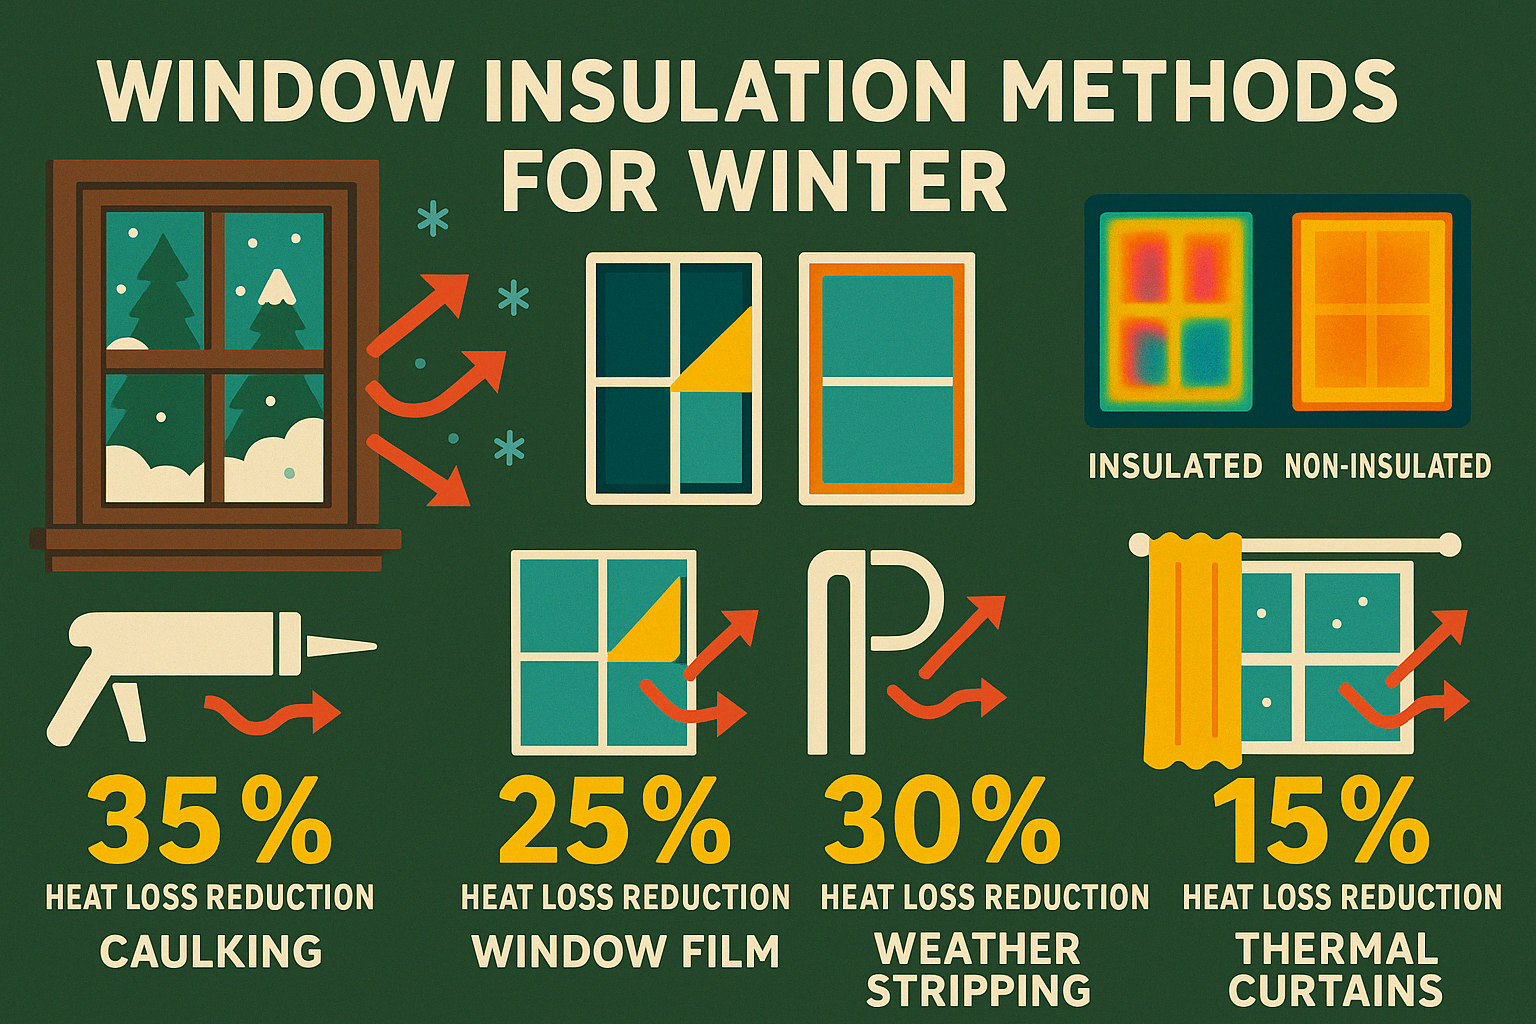
Insulate windows for winter to significantly reduce heat loss and lower your energy bills. Here’s a quick guide to the most effective window insulation methods:
| Method | Effectiveness | Cost | Difficulty |
|---|---|---|---|
| Window insulation film | High | $10-30 | Easy |
| Weather stripping | High | $5-15 | Easy |
| Caulking | Very high | $5-10 | Medium |
| Thermal curtains | Medium | $20-100 | Very easy |
| Bubble wrap | Medium | $5-10 | Very easy |
Windows can lose 25 to 35 percent of your home’s heat during cold months, making them a critical area to address for energy efficiency. When you insulate windows for winter, you’re not just preventing drafts – you’re actively keeping your heating bills manageable while maintaining a comfortable home environment.
The cold weather doesn’t have to mean sky-high heating costs. With some simple, cost-effective methods, you can create a thermal barrier that keeps warm air in and cold air out. Whether you’re a DIY enthusiast or prefer quick solutions, there are window insulation options for every skill level and budget.
I’m Geoff Stanton, President of Stanton Insurance Agency, and I’ve helped hundreds of homeowners across Massachusetts, New Hampshire, and Maine protect their investments through proper home maintenance, including effective techniques to insulate windows for winter that prevent cold-weather damage and reduce heating costs.
Insulate windows for winter vocab explained:
– Home heating safety tips
– Avoid slipping on ice
– Chimney fire prevention tips
Understanding the Importance of Window Insulation
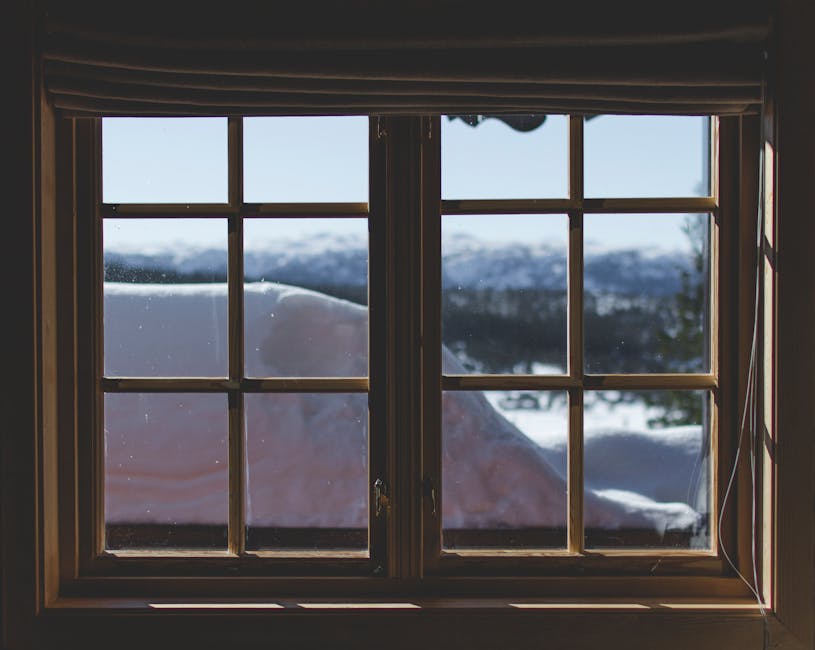
When winter settles in across Massachusetts, New Hampshire, and Maine, your cozy home faces a silent thief: heat loss through windows. I’ve seen it time and again – homeowners cranking up their thermostats while warm air quietly escapes through poorly insulated windows. The U.S. Department of Energy confirms what many of us suspect: windows can lose 25 to 35 percent of your home’s heat. That’s a third of your heating budget literally going out the window!
Think about it – you wouldn’t step outside into a snowy New England morning without your winter coat, right? Your windows deserve the same consideration. Without proper insulation, they’re essentially standing naked against the winter chill.
The benefits of taking time to insulate windows for winter go far beyond just keeping your wallet happy (though that’s certainly a nice perk). When you seal up those drafty windows, you’re creating a more comfortable living space where you can actually enjoy those snowy views instead of shivering beside them. The temperature throughout your home becomes more consistent, eliminating those cold spots that make certain rooms feel like ice caves.
I remember talking with a client in Concord who was skeptical about window insulation making much difference. After implementing the measures we recommended, she called me, genuinely surprised: “I never realized how much heat we were losing through our windows until we properly insulated them. The difference was noticeable immediately, both in comfort and on our utility bills.” Her heating costs dropped by 15% that very first winter!
This becomes especially important in those charming historic homes that dot our New England landscape. While those original windows add character and beauty, they weren’t designed with energy efficiency in mind. With proper insulation, you can preserve the historic charm while bringing the comfort into the 21st century.
By reducing energy consumption, you’re also shrinking your environmental footprint – something that feels good and aligns with the values many of us share about protecting our beautiful region. Plus, proper insulation helps protect your window frames from moisture damage, extending their lifespan and saving you from costly replacements down the road.
When you insulate windows for winter, you’re making a small investment that pays dividends in comfort, savings, and protection. It’s one of those simple home maintenance tasks that delivers results you can actually feel – both in your living space and when your utility bill arrives.
Assessing Your Current Window Insulation
Before you grab your caulking gun or roll out that window film, let’s take a moment to understand exactly what you’re dealing with. Getting to know your windows’ weak spots will save you time, money, and a whole lot of frustration when you insulate windows for winter.
Detecting Drafts
Remember playing detective as a kid? Time to channel that energy! The simple candle test remains one of the most reliable ways to spot sneaky drafts. Pick a windy day for best results:
- Close all doors and windows throughout your home
- Turn off your heating system, fans, and anything else creating air movement
- Light a candle and slowly move it around each window’s edges
- Watch carefully – if the flame dances or bends, you’ve caught a draft red-handed
“I was shocked when I did the candle test in my 1920s home in Portland,” shares one of our Stanton Insurance clients. “The flame was dancing like crazy around certain windows. It was like having tiny open doors all around my house!”
Inspecting for Gaps and Leaks
Your windows might be trying to tell you something if you just look closely. Take a few minutes to examine each window for telltale signs of insulation problems. Check for cracked or missing caulk that once sealed gaps tight. Look for spaces between the window frame and wall that shouldn’t be there. Damaged weather stripping often hides along the edges, while warped or rotted frames can create openings you might not immediately notice.
If you have double-glazed windows, pay attention to any condensation trapped between the panes – this suggests the seal has failed, and the insulating gas has escaped. These windows won’t provide the insulation they were designed for, even if they look intact.
Measuring Window Dimensions
Getting accurate measurements now saves headaches later when you’re standing in the home improvement store wondering how much material to buy. Grab your tape measure and note the width and height of each window. For window insulation films, add a few extra inches on each side to ensure full coverage. If you’re planning to add weather stripping, measure the complete perimeter of all movable parts.
I always recommend creating a simple chart with each window’s location and measurements. Trust me, you’ll thank yourself later when you’re not running back to the store mid-project!
Tools Needed for Assessment
You don’t need fancy equipment to evaluate your windows properly. A basic tape measure, candle or incense stick, and flashlight will handle most of the detective work. Keep a notepad handy to record your findings for each window. A thermometer can be surprisingly useful for checking temperature differences near windows compared to the rest of the room – larger differences often indicate poor insulation.

What many homeowners find during this assessment is that not all windows are created equal – or at least, they don’t age equally. Your south-facing windows might have different issues than those facing north. Windows on upper floors often experience different draft patterns than ground-level windows. Some might need complete insulation overhauls while others require just minor touch-ups.
By taking the time to thoroughly assess each window in your home, you’ll create a customized plan that addresses your specific needs rather than taking a one-size-fits-all approach to winter window insulation. This targeted strategy will maximize your comfort while minimizing unnecessary expenses – something we at Stanton Insurance always appreciate as fellow homeowners ourselves.
Effective Methods to Insulate Windows for Winter
Winter’s chill has a sneaky way of finding every gap in your windows, doesn’t it? After you’ve assessed your windows and found those troublesome spots, it’s time to take action. Let’s explore some tried-and-true methods to insulate windows for winter that will keep your home cozy and your heating bills manageable.
Using Caulk to Seal Gaps
Nothing defeats winter drafts quite like a good bead of caulk around your window frames. This simple, cost-effective solution creates a waterproof, airtight seal that stops cold air in its tracks.
When choosing caulk, you have several options. Silicone caulk offers excellent flexibility and water resistance, making it perfect for areas that experience temperature swings. Acrylic latex caulk is easier to work with and can be painted, ideal for smaller gaps where aesthetics matter. However, for superior durability, especially on exterior applications, polyurethane caulk is hard to beat.
“Use polyurethane caulk because it doesn’t shrink and adheres well to most materials. It’s worth spending a little more for a product that will last longer and perform better.”
Applying caulk isn’t complicated, but a few tricks will help you get professional-looking results. First, remove any old, cracking caulk with a putty knife. Clean the area thoroughly—caulk adheres best to clean, dry surfaces. Cut the tube nozzle at a 45-degree angle for better control, then apply a smooth, continuous bead along the gap. Wet your finger slightly and run it along the bead to create a neat finish. Allow it to cure overnight, and voilà—no more drafts!
Remember to work when temperatures are above 45°F for proper adhesion. Your future warm self will thank you for taking the time to do this right.
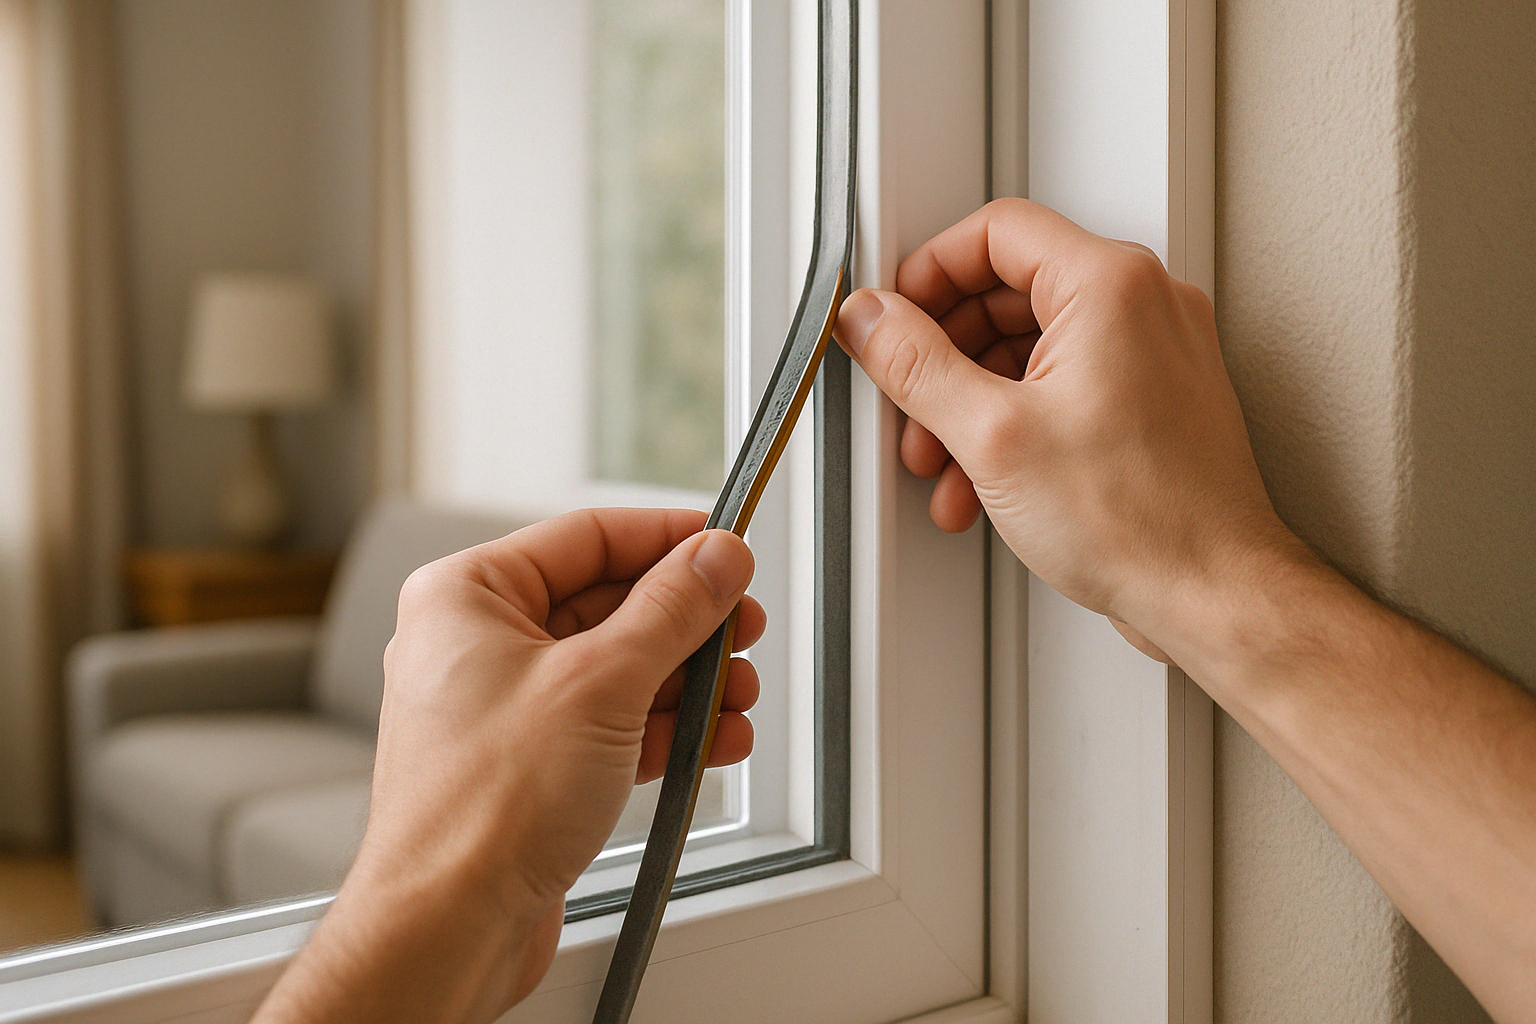
Applying Weather Stripping
Unlike caulk, weather stripping is perfect for windows you actually want to open sometimes. It creates a seal around movable parts while still allowing normal operation.
Weather stripping comes in several varieties, each with its own strengths. V-seal strips (also called tension seals) spring open to maintain contact between surfaces, creating an excellent barrier against drafts. Foam tape offers an inexpensive, easy-to-install option that works well for smaller gaps. Felt strips represent the old-school approach—not as durable as modern options but simple to cut and install. For drafts coming from beneath windows, door sweeps can be adapted to work on window sills too.
Installation is straightforward enough for even novice DIYers. Start with clean surfaces, measure carefully, and cut your weather stripping to fit precisely. For self-adhesive types, simply peel and stick along the edges where the window meets the frame. After installation, open and close your windows to make sure everything moves smoothly.
A client from Augusta told me with a laugh, “I was putting off this project thinking I’d need special skills, but it was easier than assembling my kid’s toy kitchen! Now my reading nook is draft-free for the first time in years.”
Installing Window Insulation Film
For a budget-friendly solution that works wonders, window insulation film is tough to beat. This clear plastic film creates an insulating air pocket between itself and the glass, significantly reducing heat loss without blocking your view.
The science is simple but effective—that dead air space acts as an additional layer of insulation. When properly installed and heat-shrunk with a hair dryer, the film becomes nearly invisible while still providing that crucial thermal barrier.
Getting a professional-looking installation is easier than you might think. Start by thoroughly cleaning your window frame—any dust or grime will prevent the tape from sticking properly. Apply double-sided tape around the entire frame, leaving about a 1-inch border. Cut your film generously, allowing extra material on all sides. Carefully attach the film to the tape, starting at the top and working your way down, keeping it as smooth as possible.
Now comes the satisfying part—using a hair dryer on high heat, start from the center of the film and work outward in a sweeping motion. You’ll actually see the film tighten and become crystal clear before your eyes! Finish by trimming any excess film for a clean look.
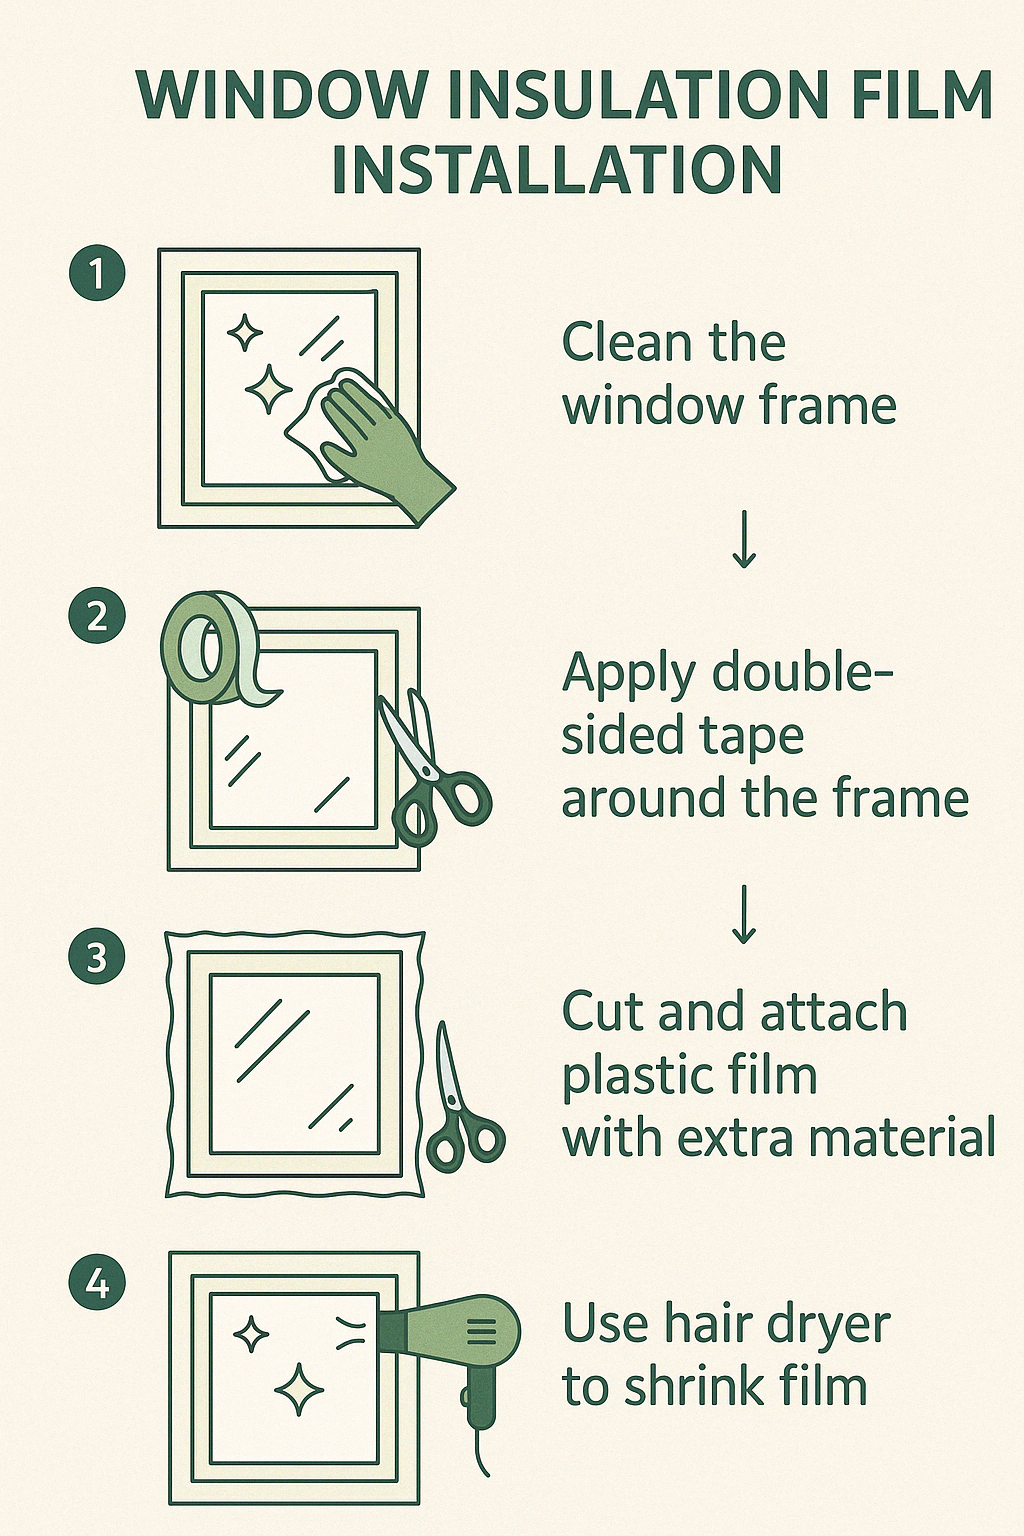
For best results, work in a warm room (above 65°F) where the film remains flexible. Apply the film with a bit of slack initially—trying to stretch it too tight before heat-shrinking often leads to tears. Keep your hair dryer moving to prevent overheating any one area, and if stubborn wrinkles appear, gently reheat those spots.
A Portsmouth homeowner shared her experience: “I was convinced the film would look awful and cheap, but I was desperate to stop the drafts in my living room. I’m amazed at how invisible it is—my neighbors have actually asked if I installed new windows because the room is so much warmer now!”
These methods can be used individually or, for maximum effectiveness, in combination. Many of our clients at Stanton Insurance Agency start with caulking and weather stripping as permanent solutions, then add window film to particularly troublesome windows during the coldest months. The best part? All these methods are temporary or reversible if you’re renting, and they’ll help protect your home from winter’s worst while keeping your energy bills in check.
Ready to try your hand at these techniques? Your warm, cozy home awaits! For more ways to protect your home this season, check out our Home heating safety tips guide.
DIY Window Insulation Techniques
When winter winds start howling, you don’t need to break the bank to stay warm. There are several creative, budget-friendly ways to insulate windows for winter that you can tackle in an afternoon. These DIY approaches are perfect for renters, those on tight budgets, or anyone who needs a quick solution before the next cold snap arrives.
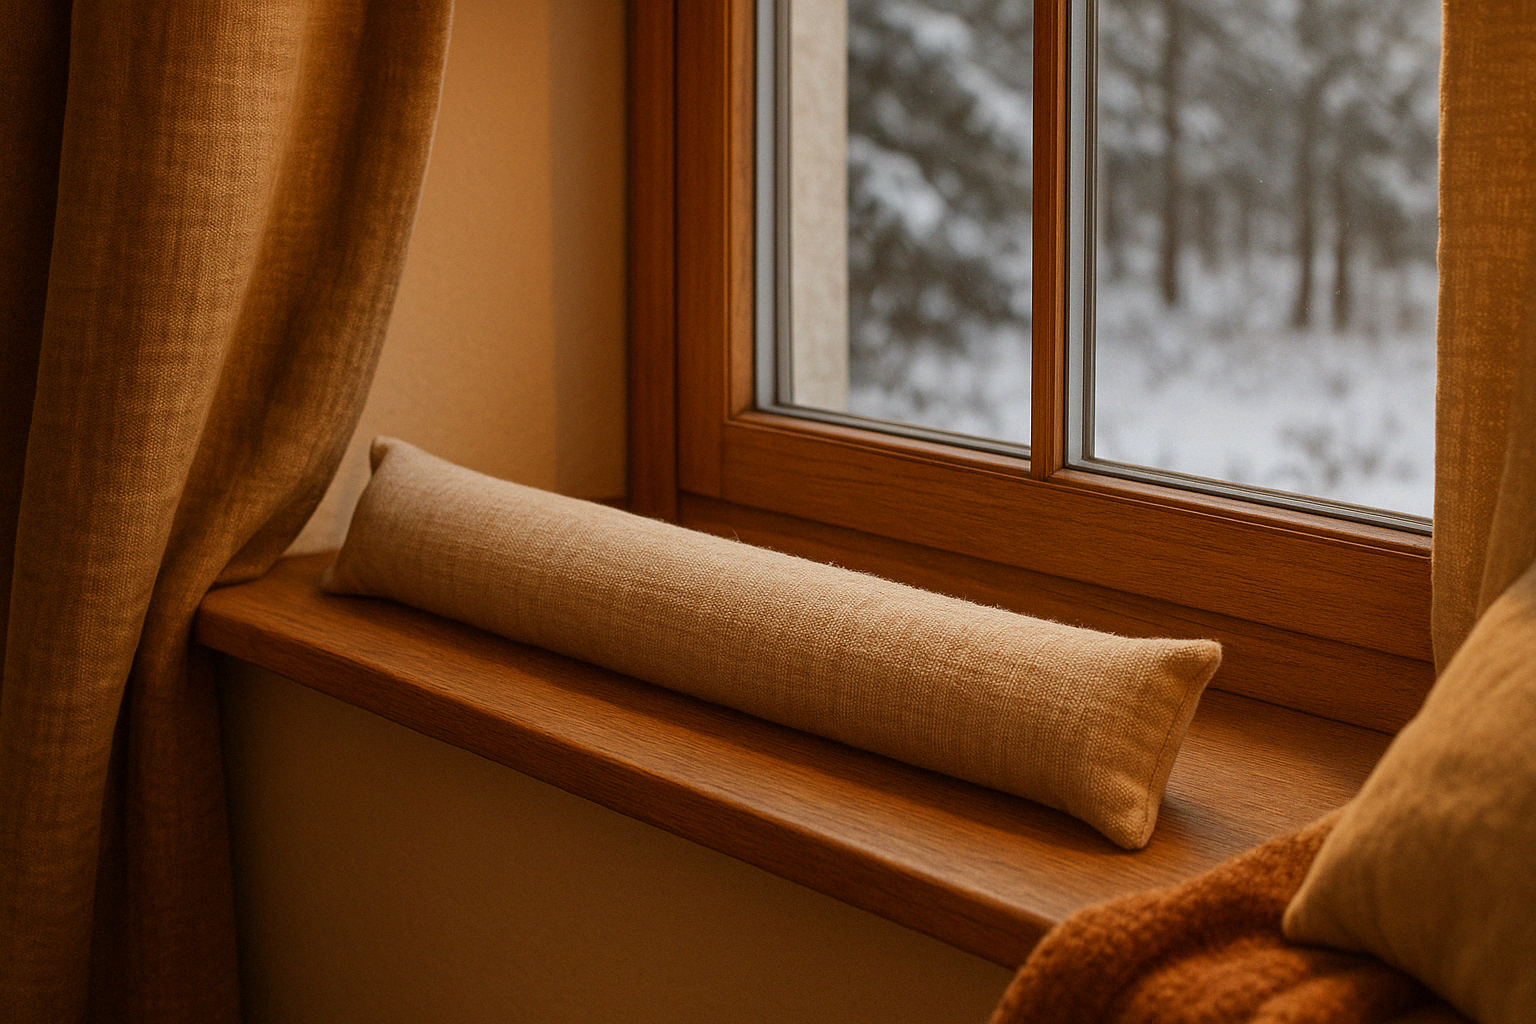
Creating DIY Draft Stoppers
Remember those snake-shaped pillows that used to line windowsills in grandma’s house? There was wisdom in that old-fashioned approach! Draft stoppers (sometimes affectionately called “draft snakes” or “door sausages”) are simple fabric tubes that block cold air from sneaking in through window gaps.
Making your own draft stopper is surprisingly simple. You’ll need some fabric (cotton or flannel works beautifully), filling material like rice, dried beans or sand, and basic sewing supplies. Measure your window width, cut fabric about 2 inches longer, fold it lengthwise with right sides together, and sew along the long edge and one short edge. After turning it right-side out, fill it with your chosen material—rice and beans add nice weight that helps it stay put—then sew the open end closed.
“My grandmother used to make these for our drafty farmhouse in Maine,” recalls a long-time client. “She’d make them look like cats with button eyes and yarn tails. They were so effective that I’ve continued the tradition in my own home, though mine aren’t quite as cute!”
The beauty of draft stoppers is that they’re completely removable, cause no damage, and can even add a decorative touch to your windows. Plus, you can reuse them year after year, making them a truly sustainable solution.
Using Bubble Wrap as Temporary Insulation
This next technique might raise some eyebrows, but bubble wrap is secretly one of the most effective temporary window insulators around. While it won’t win any beauty contests, it’s remarkably effective and costs next to nothing.
The application couldn’t be simpler: cut bubble wrap to fit your window pane (slightly smaller than the glass area), spray a light mist of water directly onto the clean window, and press the bubble side against the wet glass. That’s it! The water creates enough surface tension to hold the bubble wrap in place, and when spring arrives, you simply peel it away.
Why does this work so well? Those little air bubbles function similarly to double-pane windows, creating insulating air pockets that significantly reduce heat transfer. The trapped air acts as a thermal barrier between your warm room and the cold glass surface.
A professor from Brunswick, ME, told us: “I use bubble wrap on my basement windows every winter. It’s not pretty, but nobody sees those windows anyway, and my heating bills dropped noticeably after I started doing it. For windows where appearance matters, I use other methods.”
The bubble wrap method is particularly useful for rarely-used rooms, north-facing windows, or any window where function matters more than form. While it does diffuse light rather than blocking it entirely, you won’t have a clear view outside. For many homeowners, this tradeoff is worth the considerable energy savings and increased comfort.
You can find bubble wrap in packaging you receive or purchase it inexpensively at any shipping store. For best results, use the version with larger bubbles, which creates more insulating air space. Some clever homeowners even spray-paint one side of the bubble wrap to match their wall color, making it less noticeable from outside.
For more creative approaches to window insulation, check out this guide to Removable Decorated Window Insulation that combines function with style.
When you insulate windows for winter using these DIY methods, you’re not just saving money—you’re also reducing your environmental impact and keeping your home cozy through the coldest months.
Long-Term Solutions for Improved Window Insulation
When the winter winds howl outside your New England home, temporary fixes can only do so much. If you’re ready to make a more significant impact on your comfort and energy bills, it’s time to consider long-term solutions to insulate windows for winter that will serve you for years to come.
Upgrading Windows
I remember visiting a client in Newburyport whose 1980s windows were practically inviting the cold air inside. After upgrading to energy-efficient models, she called me excitedly the following winter: “Geoff, I can actually sit by my windows with a book now without needing three blankets!”
Modern energy-efficient windows do more than just look nice—they’re engineering marvels designed specifically to keep your home comfortable while reducing energy consumption. Today’s windows feature multiple layers of glass with insulating air or gas between them, special coatings that reflect heat back into your home, and frames designed to minimize thermal bridging.
According to the U.S. Department of Energy, “Replacing old windows with ENERGY STAR certified ones can lower household energy bills by an average of 12 percent nationwide.” For many of our clients across Massachusetts, New Hampshire, and Maine, this translates to hundreds of dollars saved each year—money that quickly helps offset the initial investment.
Comparing Single-Pane vs. Double-Pane Windows
| Feature | Single-Pane Windows | Double-Pane Windows |
|---|---|---|
| R-value (insulation) | 0.9-1.0 | 2.0-3.0 |
| U-factor (heat transfer) | 1.0 | 0.3-0.5 (lower is better) |
| Noise reduction | Minimal | Significant |
| Condensation resistance | Poor | Good |
| Typical lifespan | 15-20 years | 20-25 years |
| Cost | Lower initial cost | Higher initial cost, lower long-term cost |
| Energy savings | Minimal | Up to 24% in cold climates |
One of our Salem clients told me after their window upgrade, “The difference is remarkable—not just in our heating bills, which dropped by about 15%, but in how comfortable our home feels. No more cold spots near the windows, and the street noise is dramatically reduced too.”
While new windows represent a significant upfront investment, they’re one of the few home improvements that improve your daily comfort while simultaneously paying you back through energy savings. They also boost your home’s resale value—an important consideration if you might sell in the future.
Installing Storm Windows
For many New England homeowners—especially those with historic homes—completely replacing original windows isn’t always desirable or even permitted. That’s where storm windows come to the rescue as an excellent middle-ground solution to insulate windows for winter.
Storm windows add an additional protective layer that dramatically improves insulation without sacrificing the character of your original windows. They’re particularly popular in historic districts from Portland to Portsmouth, where preservation covenants often restrict replacement options.
The advantages are substantial: storm windows can cost 50-75% less than full window replacement while still reducing heat loss by up to 50%. They also help protect your existing windows from weather damage, potentially extending their lifespan by decades.
You have options when it comes to storm window installation. Interior models are easier to install and maintain, while exterior versions provide better weather protection. Many of our clients opt for removable models that can be installed for winter and stored during warmer months.
A client from a historic district in Portsmouth shared her experience: “Our home preservation covenant prevents us from replacing the original 19th-century windows. Installing interior storm windows was the perfect solution—they’re nearly invisible, but they’ve made our home so much more comfortable in winter.”

When selecting storm windows, look for models with weather stripping and, ideally, low-emissivity coatings for maximum efficiency. Proper installation is crucial—even the best storm windows won’t perform well if they’re not correctly sealed against air leakage.
While these long-term solutions require more initial investment than the DIY methods we’ve discussed, they provide lasting protection against winter’s chill while potentially adding value to your home. As insurance professionals who see the aftermath of winter damage, we can confidently say that properly insulated windows are one of the smartest investments you can make in your New England home.
Health and Safety Considerations When Insulating Windows
When you insulate windows for winter, you’re not just saving money and staying cozy—you’re also creating changes to your home’s internal environment. Let’s talk about how to keep your newly-insulated home healthy and safe for everyone inside.
Indoor Air Quality
Have you ever noticed how a tightly sealed home can sometimes feel a bit stuffy? There’s a good reason for that. When we seal up drafts and insulate our windows, we’re also reducing the natural air exchange that typically occurs in our homes.
While this is great for keeping warm air in, it can also trap pollutants, cooking odors, and excess moisture inside. A client from Bangor told me last winter, “My energy bills went down dramatically after insulating my windows, but I noticed my asthma symptoms seemed worse. I hadn’t considered the air quality aspect.”
To maintain healthy indoor air while enjoying your well-insulated windows:
- Use kitchen and bathroom exhaust fans regularly, especially when cooking or showering
- Consider cracking a window for 5-10 minutes daily, even in winter (ideally during the warmest part of the day)
- Add some houseplants that naturally purify air
- If you have a forced-air heating system, change filters monthly during heating season
For homes with extensive insulation improvements, a heat recovery ventilator (HRV) system might be worth considering. These clever systems bring in fresh air while transferring the heat from outgoing stale air, giving you ventilation without sacrificing energy efficiency.
Avoiding Mold and Condensation
One of the most common issues with newly insulated windows is condensation. While properly insulated windows for winter should actually reduce condensation, sometimes the opposite happens temporarily.
“Proper insulation keeps cold air from infiltrating your apartment and heated air from leaking out.”
This quote highlights the main benefit, but there’s a balance to maintain. When warm, moist indoor air meets cold surfaces, condensation forms—and that moisture can lead to mold if not addressed.
A retired teacher from Portland shared her experience: “After putting up window film, I noticed water droplets forming between the film and glass. I was worried I’d done something wrong, but it was just that my humidity was too high from all my cooking and houseplants.”
To prevent moisture issues in your insulated home:
- Keep indoor humidity between 30-50% in winter (a simple humidity gauge costs under $10)
- Use a dehumidifier if needed, particularly in basements or bathrooms
- Ensure your home has proper ventilation in high-moisture areas
- If using window films or bubble wrap insulation, check behind them weekly for moisture buildup
- Address any window leaks immediately—insulation isn’t a substitute for repair
Safe Materials
The materials you choose for window insulation matter—not just for effectiveness, but for your family’s health too. When selecting products to insulate windows for winter, consider their composition and potential impacts.
For caulking and adhesives, look for low-VOC (volatile organic compound) options. These release fewer chemicals into your home’s air and typically have less odor. The small price difference is worth it, especially if you have children, elderly family members, or people with respiratory conditions in your home.
Be particularly cautious with spray foam insulation products. While effective, many require good ventilation during application and curing time. One homeowner in Augusta learned this the hard way: “I sealed my window frames with expanding foam on a cold day and kept the windows closed. The headache I got was terrible! I should have read the instructions about ventilation.”
For DIY draft stoppers, choose fillings wisely. Rice and beans work well but can attract pests if they get damp. Sand is heavier and less appealing to critters but can be messy if spilled. Polyester fiberfill is lightweight but won’t grow mold if it gets wet—a good choice for homes with condensation issues.
Finally, some insulation methods can create fire hazards if improperly placed. Keep plastic window films, thermal curtains, and fabric draft stoppers well away from space heaters, radiators, candles, and other heat sources. The warmth and comfort of an insulated home should never come at the expense of safety.
At Stanton Insurance Agency, we’re committed to helping you protect not just your property, but the people who make it a home. Proper window insulation is one of many ways to safeguard what matters most during the challenging New England winters.
Frequently Asked Questions about Window Insulation
How can I insulate my windows cheaply for winter?
When your budget is tight but your home is cold, affordable window insulation becomes a priority. Thankfully, some of the most effective solutions are also the least expensive.
Bubble wrap offers remarkable insulation for pennies per window. This grocery store staple creates an insulating air pocket while still allowing light to filter through. For about $5-10, you can cover several windows. The application couldn’t be simpler – just spray clean glass with water and press the bubble side against it. The surface tension holds it in place all winter.
Draft snakes (those fabric tubes that block bottom gaps) can cost absolutely nothing if you repurpose household items. An old towel rolled up works in a pinch, while fabric scraps filled with rice or beans make a more permanent solution. These humble guardians prevent cold air from sneaking under your window frames.
Rope caulk deserves more attention than it gets. This putty-like material (about $5-6 for 90 feet) can be hand-molded and pressed into window gaps, creating an effective seal that peels away cleanly in spring without damaging your paint or window frames.
One of our clients in Bangor shared her budget-friendly success story: “I was really watching my pennies last winter and decided to try the bubble wrap method on my north-facing windows. Combined with homemade draft snakes on all my sills, I saw my heating bill drop about $30 monthly. Not bad for spending less than $20 on materials!”
Is it worth investing in energy-efficient windows?
This question resembles asking whether a good winter coat is worth the investment – the answer depends on your specific situation, but for most New Englanders, it’s a resounding yes.
ENERGY STAR certified windows can shrink your heating bills by an average of 12% nationwide, with even greater savings in our harsh northern climate. Over their typical 20-25 year lifespan, these windows quietly return your investment through consistent energy savings and noticeably improved comfort.
The initial cost gives many homeowners pause – typically $300-$1,000 per window installed. However, this investment often pays for itself through multiple channels:
– Ongoing energy savings that accumulate year after year
– Potential tax credits or energy rebates that reduce the effective cost
– Increased home value (up to 70% of the project cost, according to Remodeling Magazine)
– Significantly reduced maintenance compared to older windows
A client from Nashua recently reflected on her decision: “We bit the bullet and replaced all our windows five years ago for about $12,000. We’ve saved roughly $350 annually on heating and cooling since then, which is nice, but honestly? The real value has been in comfort. No more drafts, no more cold spots by the windows, no more plastic film every November. For us, that comfort factor has been priceless.”
Can window insulation impact indoor air quality?
Absolutely – and this relationship works in both positive and negative ways. Understanding the connection helps you insulate windows for winter without creating new problems.
Proper insulation reduces drafts, which improves comfort and prevents cold outdoor air (which is often drier in winter) from constantly entering your home. This more stable environment can actually benefit those with respiratory sensitivities.
However, too much sealing without adequate ventilation can trap indoor pollutants from cooking, cleaning products, and off-gassing from furniture. It’s a balancing act – you want to keep cold air out without creating a sealed box.
Moisture management becomes particularly important with well-insulated windows. Good insulation should reduce condensation that leads to mold growth. Yet if your home has high humidity and windows are sealed too tightly, moisture might become trapped, potentially creating health issues.
To maintain healthy indoor air while keeping your home warm:
1. Maintain indoor humidity between 30-50%
2. Use bathroom and kitchen exhaust fans regularly
3. Consider brief “air-out” periods on milder winter days
4. Choose low-VOC materials for any caulking or sealing projects
5. Watch for condensation as an early warning sign of ventilation issues
“We went all-out insulating our windows last year,” a Portland homeowner told me, “but then noticed the air feeling stale and stuffy. Adding a small air purifier and being more diligent about using the kitchen exhaust when cooking made a remarkable difference. Now we have both comfort and fresh air.”
For families with asthma or allergies, finding this sweet spot between energy efficiency and proper ventilation becomes especially important – and might require adjusting your approach to window insulation throughout the season.
Conclusion
As the crisp winter air settles across New England, your windows become crucial allies in the battle against the cold. Throughout this guide, we’ve explored numerous ways to insulate windows for winter – from quick weekend projects to more substantial investments that pay dividends for years to come.
Think of window insulation as putting a warm winter coat on your home. Just as you wouldn’t face January in Massachusetts without proper layers, your windows shouldn’t face winter’s fury unprotected. The beauty of window insulation is that there’s an approach for every situation and budget.
For those needing immediate results without breaking the bank, temporary solutions like window film and weather stripping deliver remarkable value. Many of our clients express surprise at how much difference these simple fixes make in both comfort and energy bills. As one Concord homeowner told me, “I can actually sit near my windows now without feeling like I’m camping outdoors!”
Owners of historic homes face special challenges – those charming original windows are part of your home’s character, but they can leak heat like a sieve. Storm windows and specialized techniques help preserve that historic charm while bringing your comfort into the 21st century. The right approach honors your home’s heritage while acknowledging modern energy realities.
For those thinking long-term, investing in energy-efficient replacement windows might be the wisest choice. While the upfront cost is higher, the comfort improvement and energy savings accumulate year after year. Your future self will thank you every time a winter heating bill arrives.
Window insulation is just one piece of a comprehensive home winterization strategy. For a complete approach to home protection through all seasons, our Spring Home Maintenance guide offers valuable insights on year-round preparedness.
At Stanton Insurance Agency, we believe protecting your home extends beyond insurance policies to include practical strategies that prevent problems before they start. Properly insulated windows not only keep you cozy but also protect against moisture damage that can lead to expensive repairs down the road.
Different windows in your home may need different approaches. Those south-facing windows benefit from solutions that allow warming sunlight to enter during daytime hours, while north-facing windows need maximum insulation to block persistent cold. Don’t be afraid to mix and match techniques for the best results.
Taking action now to insulate windows for winter delivers immediate comfort and represents an investment in your home’s long-term health. The energy savings typically pay for materials and effort many times over throughout the cold season – a rare win-win in home maintenance.
For more information on protecting your home through all seasons, reach out to us at Stanton Insurance Agency. We’re proud to serve homeowners throughout Massachusetts, New Hampshire, and Maine with practical advice and comprehensive coverage that provides peace of mind, whatever weather comes your way. After all, a well-insulated home is a happy home – and a more affordable one to heat!
